
Coding & adaptation
With coding and adaptation, you can enable vehicle functions, change ECU parameters, reset service intervals, and maintain the installation list.
These are “write” functions: they actively intervene in the configuration of ECUs and change parameters in the vehicle—so only use them if you know what you're doing, and always write down the original values first. Many ECUs require security access or an SFD unlock beforehand.
Coding
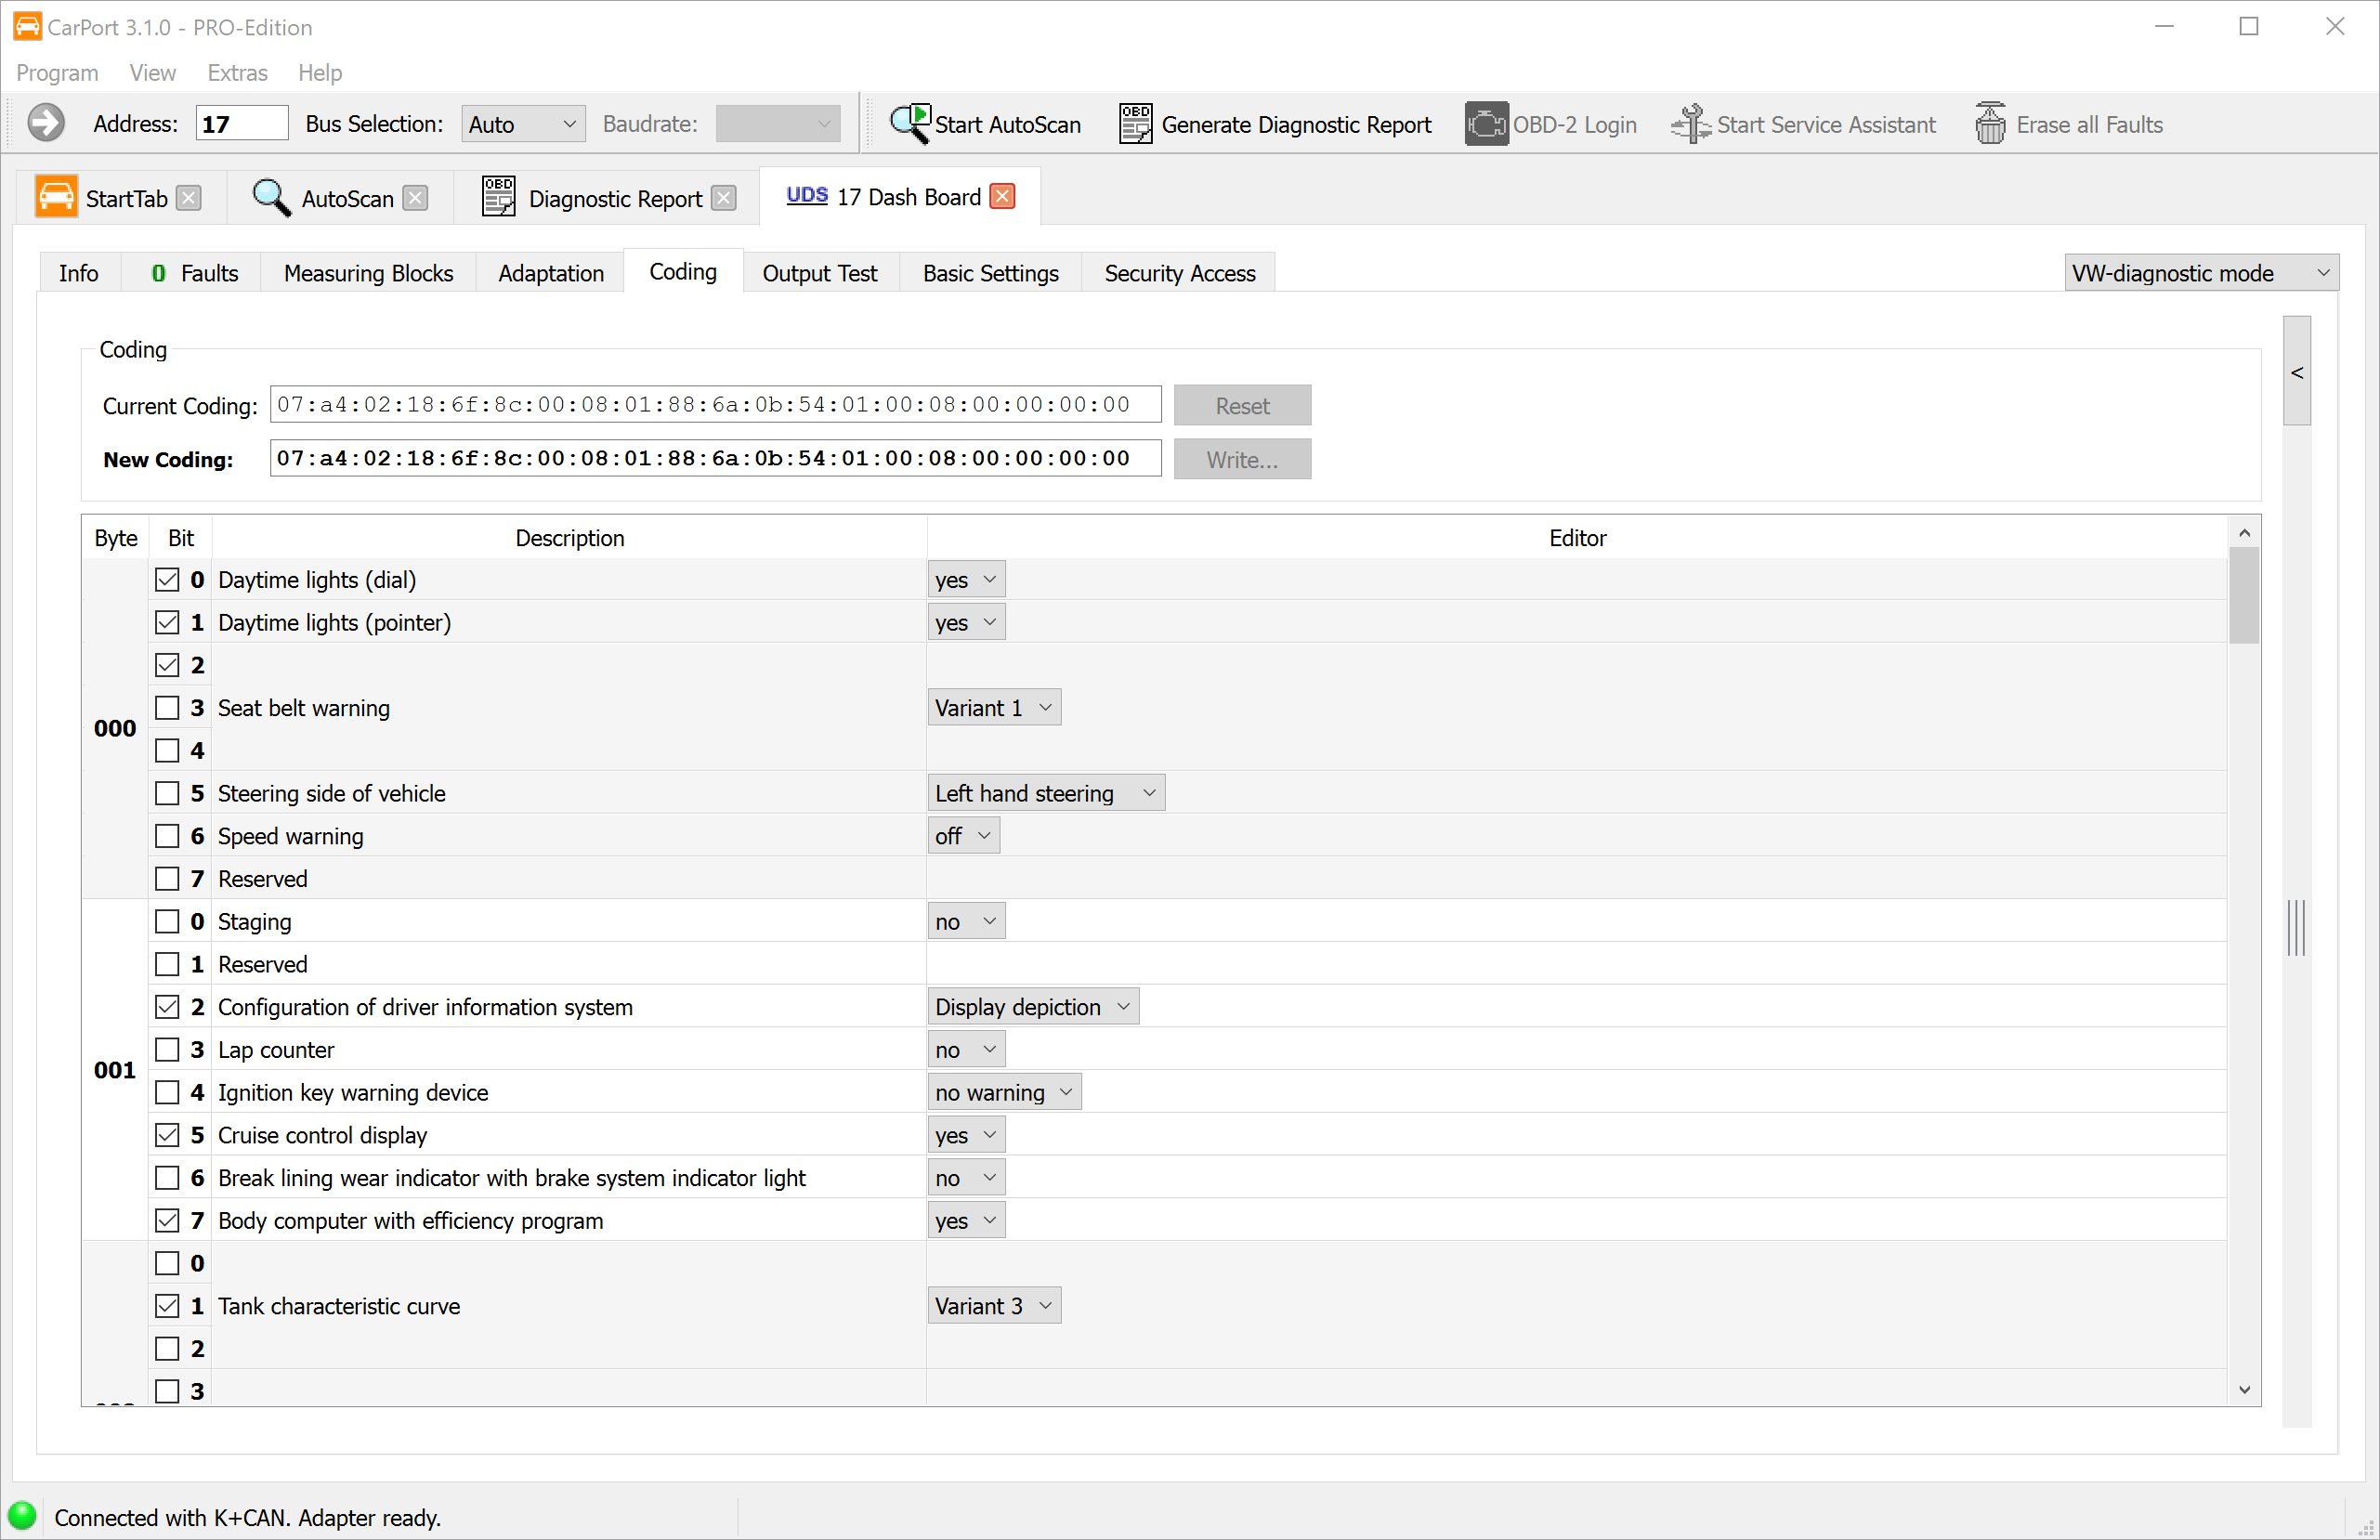
ECU coding is used to enable or disable functions or to switch between different variants. Every vehicle model is offered with a wide range of equipment options that vary by market, model, and standard equipment. The installed hardware is often identical—only the coding of the associated ECU determines which functions are actually active.
A typical example: a vehicle comes from the factory with halogen headlights, but the hardware also supports xenon or LED. The ECU coding specifies which type of headlight is installed and how the lighting control works. Other common coding changes include:
- Enabling or disabling the daytime running lights
- Central locking behavior (e.g., automatic locking while driving)
- Mirror tilt-down when reversing
- Configuring the number of comfort turn signal flashes
- Adjusting the closing assistance for power windows
⚠️ Caution: Incorrect coding can cause vehicle functions to stop working properly or trigger error messages in the ECU. Before making any change, write down the current coding value so you can restore it if necessary.
The VAG group distinguishes between two coding methods. Which method is used depends solely on how the ECU is implemented.
Short coding
Short coding uses a simple numeric code (3-, 5-, or 7-digit decimal number) to define an ECU's configuration. Each digit or group of digits within this code represents a specific set of functions.
- Protocols: KWP1281 and KWP2000 only.
- Variants and value ranges: Depending on the ECU, one of four variants is used. CarPort detects the type automatically and restricts the permitted input range accordingly:
| Variant | Value range | Digits |
|---|---|---|
| 7-bit | 0–127 | 3 digits |
| 15-bit | 0–32767 | 5 digits |
| 20-bit | 0–1048575 | 7 digits |
| 23-bit | 0–8388607 | 7 digits |
- Display: If label data is available, CarPort shows the meaning of each digit or group of digits in plain text (e.g., “Digit 1: headlight type – 0 = halogen, 1 = xenon”). Without label data, the numeric code is shown without further explanation.
Step-by-step instructions (short coding):
- CarPort shows the coding value currently stored in the ECU. Write this value down.
- If label data is available, you can change the individual digits using the selection fields shown.
- Alternatively, enter the new coding value directly as a number in the
New Coding:input field. - Click
Write...to transfer the coding to the ECU.
Long coding
Long coding offers much finer control over the ECU configuration. Instead of a single number, it uses a hexadecimal byte string in which each individual bit represents a specific function or parameter.
- Protocols: KWP2000 and UDS.
- Display: The coding is displayed as a sequence of bytes (e.g.,
0F 3A 00 12 8B). Each byte consists of 8 bits that can be set or cleared individually.
Display with and without label data:
If label data is available for the ECU, CarPort shows a plain-text description as a checkbox for each bit (e.g., “Daytime running lights active,” “Mirror tilt-down when reversing”). You can configure the functions you want simply by checking or unchecking the boxes.
If no label data is available, CarPort shows a generic view with byte and bit numbers (e.g., “Byte 3, Bit 5”). In this case, you need to know what the individual bits mean from an external source (e.g., vehicle forums, workshop documentation). Once you have that information, however, you can change the bits very precisely.
Step-by-step instructions (long coding):
- CarPort reads the current coding from the ECU and displays it. Write down the hexadecimal value shown as a backup. You can also find the coding in the diagnostic report.
- Enable or disable the functions you want using the selection fields (if label data is available), change the bit values using the checkboxes, or write entire byte values directly into the
New Coding:input field. - Click
Write...to transfer the new coding to the ECU.
💡 Tip: In the byte view, you can edit individual bytes directly as hexadecimal values. The checkbox display updates automatically and vice versa—both views are always in sync.
Coding and security access
Some ECUs require security access before a new coding can be written. In this case, CarPort prompts you to enter the required access code before the transfer. On newer vehicles with SFD (Vehicle Diagnostics Protection), coding changes may also be restricted by cryptographic protection mechanisms.
Adaptation
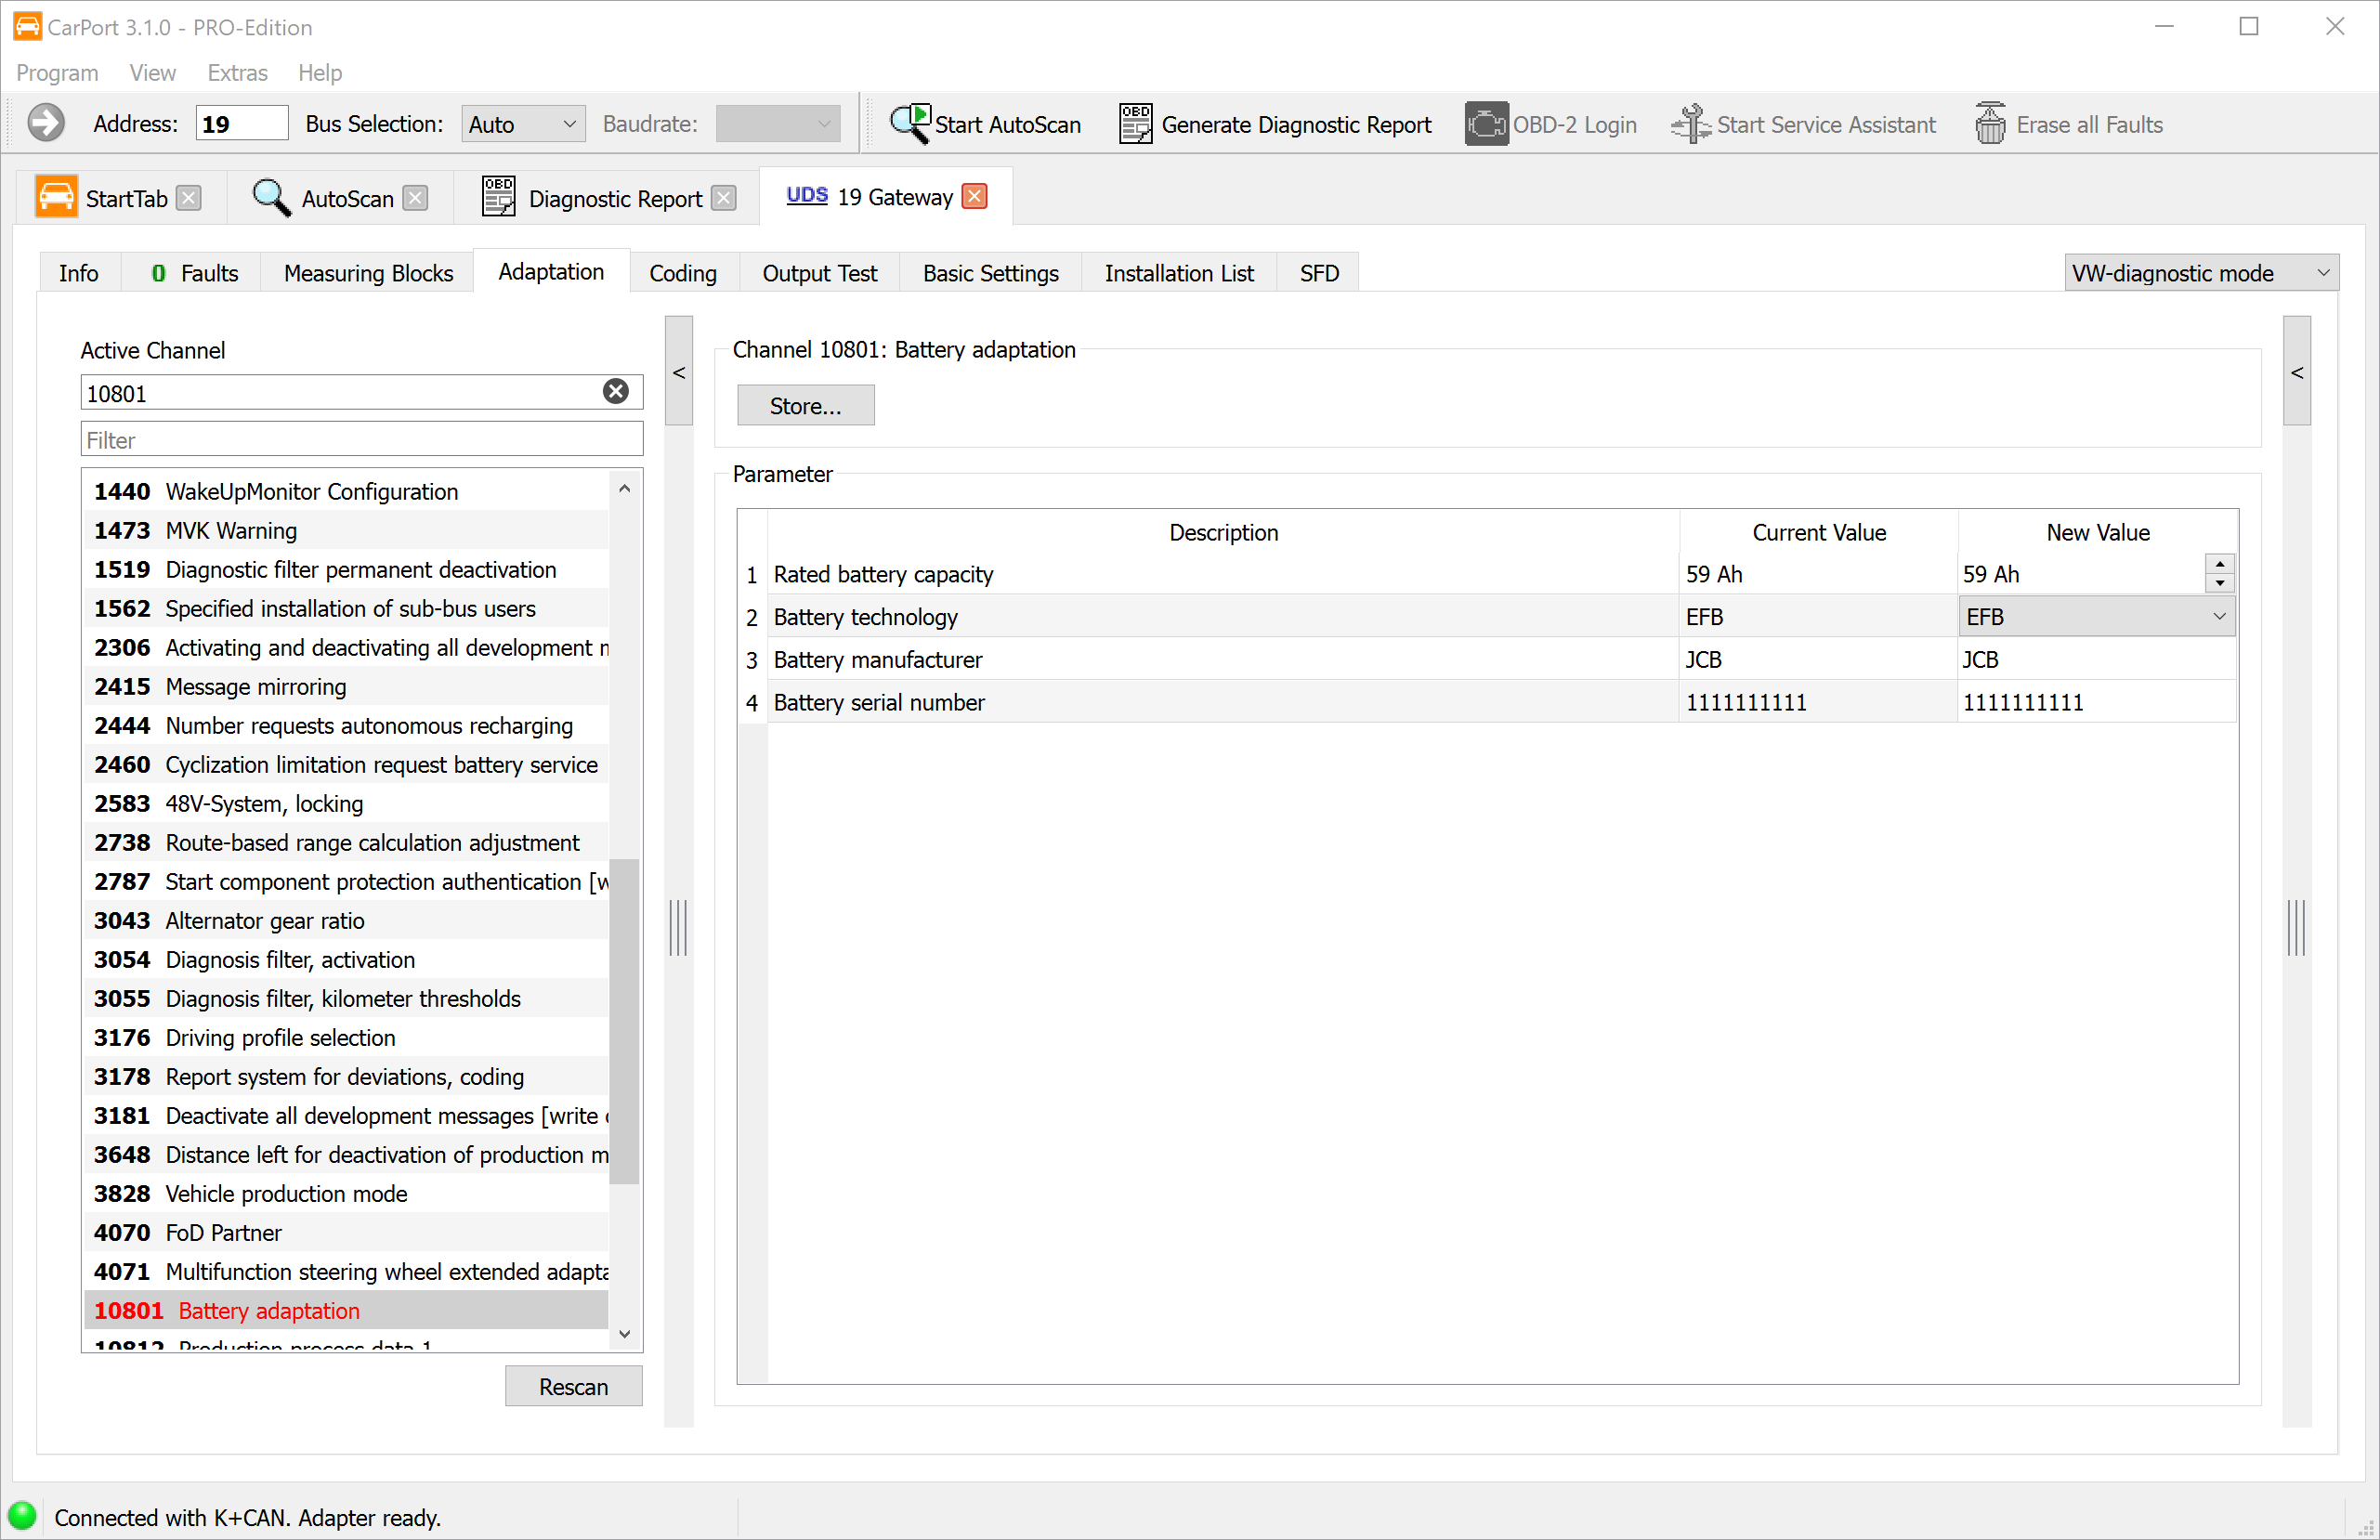
Adaptation lets you change an ECU's configurable parameters. Unlike coding, which switches functions on or off, adaptation is used to calibrate or adjust values within an existing function.
Typical use cases for adaptation include:
- Calibration after replacing a component: e.g., storing the injector quantity values after replacing an injector.
- Adjusting specified values: e.g., idle speed, light sensitivity of the rain/light sensor, sensitivity of the parking aid.
- Enabling functions with parameters: e.g., daytime running light dimming value, coming-home duration.
- Resetting service counters: e.g., resetting the service interval display after an oil change (more convenient with the Service Assistant).
⚠️ Caution: Adaptations change the behavior of the ECU. Incorrect values can cause malfunctions or safety-critical misbehavior. Before making any change, write down the current original value so you can restore it if necessary.
The procedure and the way the adaptation function is displayed differ considerably depending on the diagnostic protocol used.
Adaptation with KWP1281 / KWP2000
With the older KWP1281 and KWP2000 protocols, the adaptation parameters are organized in numbered channels:
- KWP1281: Channels 0 to 100
- KWP2000: Channels 0 to 255
Each channel contains a single value. This is usually a 16-bit value (range 0–65535) or an 8-bit value (range 0–255). A special form is long adaptation, which stores ASCII text values (e.g., injector quantity values as a character string).
Channel display:
If CarPort has label data for the ECU, the channels are displayed with plain-text names (e.g., “Idle speed,” “Throttle body adaptation”). In addition, the raw data is converted into physical values with units (e.g., 0–100% or −50 to +50 °C) or displayed as a selection list (e.g., “0 = off, 1 = on”).
If no label data is available, the channels are displayed generically by channel number (e.g., “Adaptation 42”) with the unformatted raw value. You can turn the use of label data on and off with the Use label file information if available checkbox, which also gives you direct access to the raw values.
Step-by-step instructions:
- Select the adaptation channel you want from the list or enter the channel number manually.
- The value currently stored in the ECU is displayed. Write this value down before making any changes.
- Enter the new value in the input field.
- Click
Testto test the value.- The value is written to the ECU's volatile memory. The ECU uses the new value immediately, but it's lost at the next restart.
- If the value is invalid or out of the permitted range, the ECU returns an error message.
- Check whether the desired behavior occurs.
- Click
Store...to save the value permanently in the ECU.
💡 Tip: The two-step process (Test → Store) serves as a safety mechanism. As long as you only use Test, you can return to the original value at any time by switching the ignition off and on again. Only Store... makes the change permanent.
Adaptation with UDS
On modern ECUs with the UDS protocol, adaptation works fundamentally differently:
- Identifiers instead of channel numbers: Adaptation parameters are addressed via 16-bit identifiers. They can only be mapped to plain-text names via ODX data (ASAM dataset).
- Complex data structures: UDS adaptation values can be simple numeric values, but also bit fields, character strings, or multi-part structures.
- Direct saving: Unlike KWP1281/KWP2000, UDS has no separate test step. Changes are saved in the ECU permanently and immediately when they're transferred.
- Label data required: Without the matching ODX data, the identifiers and their values can't be interpreted. CarPort therefore strictly requires the correct label data for the respective ECU.
⚠️ Caution: Since changes on UDS ECUs are saved permanently right away, there's no way to test the new value temporarily first. Make sure the value you've entered is correct before you transfer it.
Service Assistant
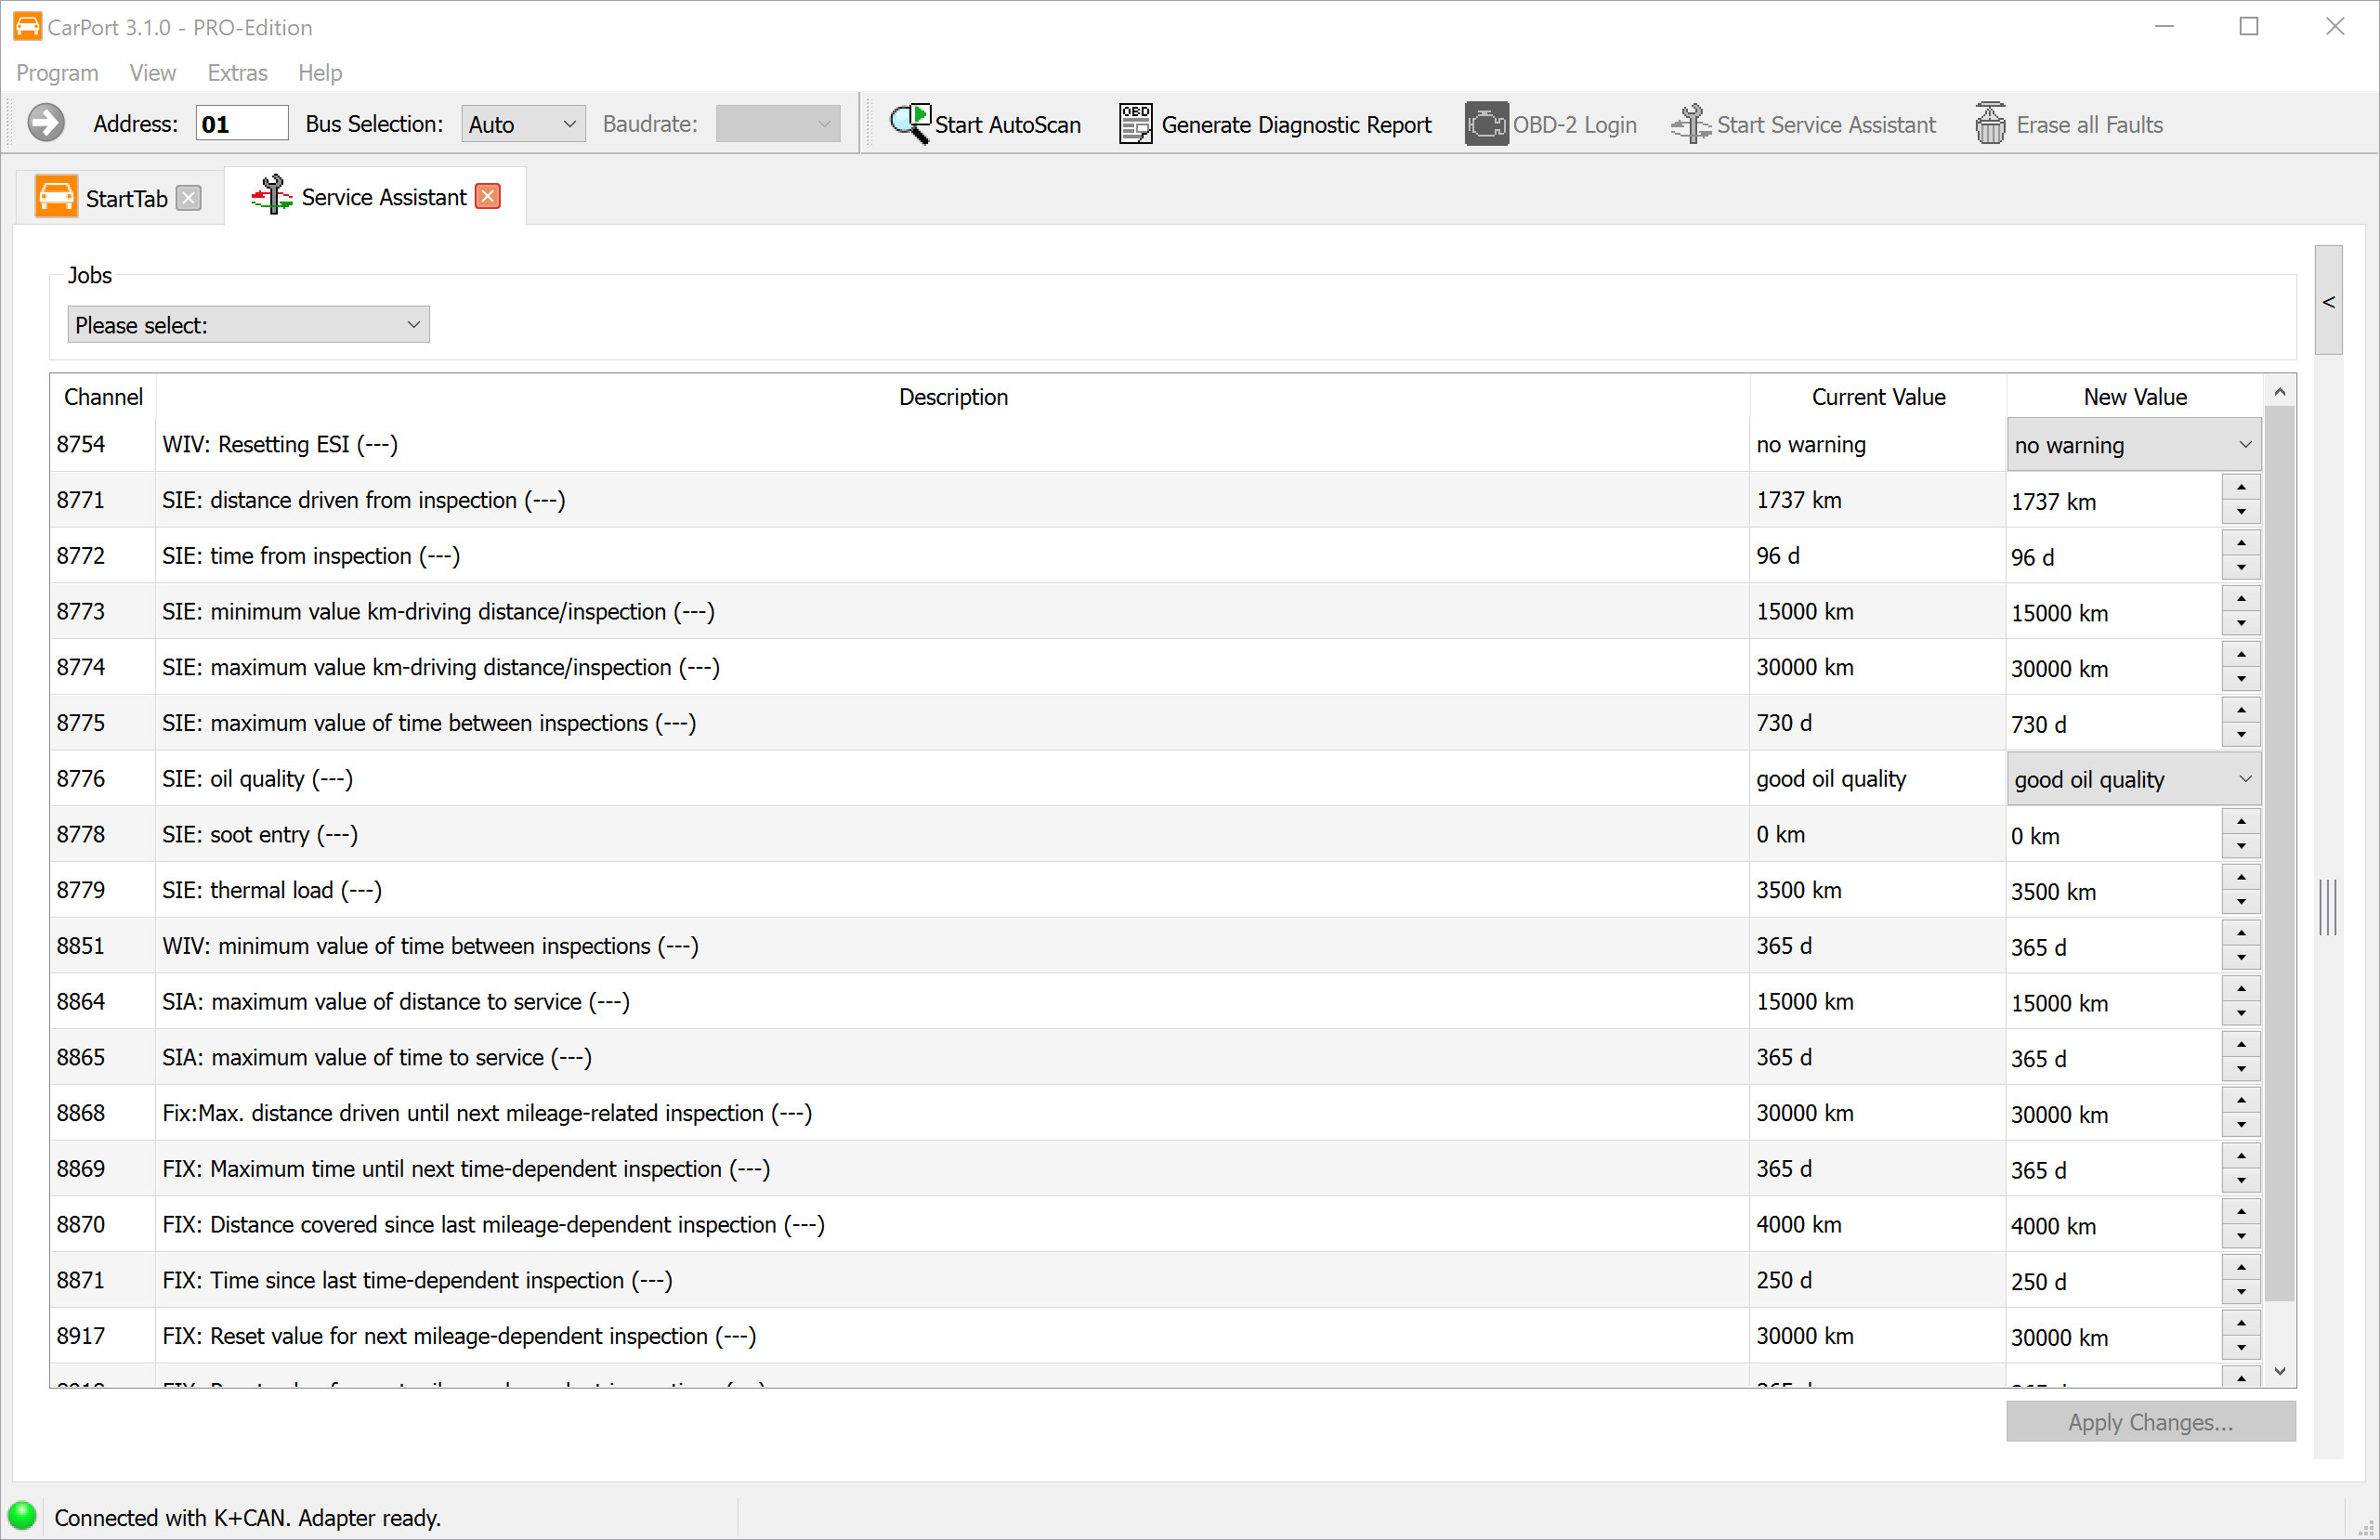
Volkswagen Group vehicles have a service interval display that reminds the driver of upcoming maintenance (e.g., oil change, inspection). This interval data is stored in the instrument cluster as adaptation channels and typically includes the remaining distance (in km) and the remaining time (in days) until the next service.
After maintenance has been carried out, these counters must be reset manually for the service interval display to work correctly. Technically, this is done via the instrument cluster's adaptation function—the relevant channels have to be set to the appropriate values one by one.
The Service Assistant in CarPort makes this process much easier: it combines all relevant service interval parameters in one clear view and lets you reset them with just a few clicks—you don't need to know the individual adaptation channels or their target values.
Features:
- Clear display: All adaptation channels relevant to the service interval are shown with their current and new values.
- Predefined jobs: In the
Jobsarea, common service scenarios are available as predefined selection groups (e.g., reset only the oil change interval, reset oil change + inspection). Selecting a job automatically marks the associated adaptation channels with the correct target values. - Change preview: All channels whose values will be changed by the selected job are highlighted in yellow—so you can see exactly which parameters will be adjusted before you transfer anything.
Step-by-step instructions:
- Start the Service Assistant from the
Extras→Start Service Assistantmenu or with the button of the same name in the toolbar. - In the
Jobsarea, select the service job you want (e.g., oil change, inspection, or both). - Check the changes highlighted in yellow in the overview. If necessary, you can adjust individual values manually.
- Click
Apply Changes...to transfer the changes to the ECU. - Switch the ignition off and on again so that the instrument cluster applies the new values and the service interval display is updated.
💡 Tip: If the Service Assistant doesn't offer any predefined jobs for your vehicle, you can also reset the service intervals manually using the instrument cluster's adaptation function.
Installation list
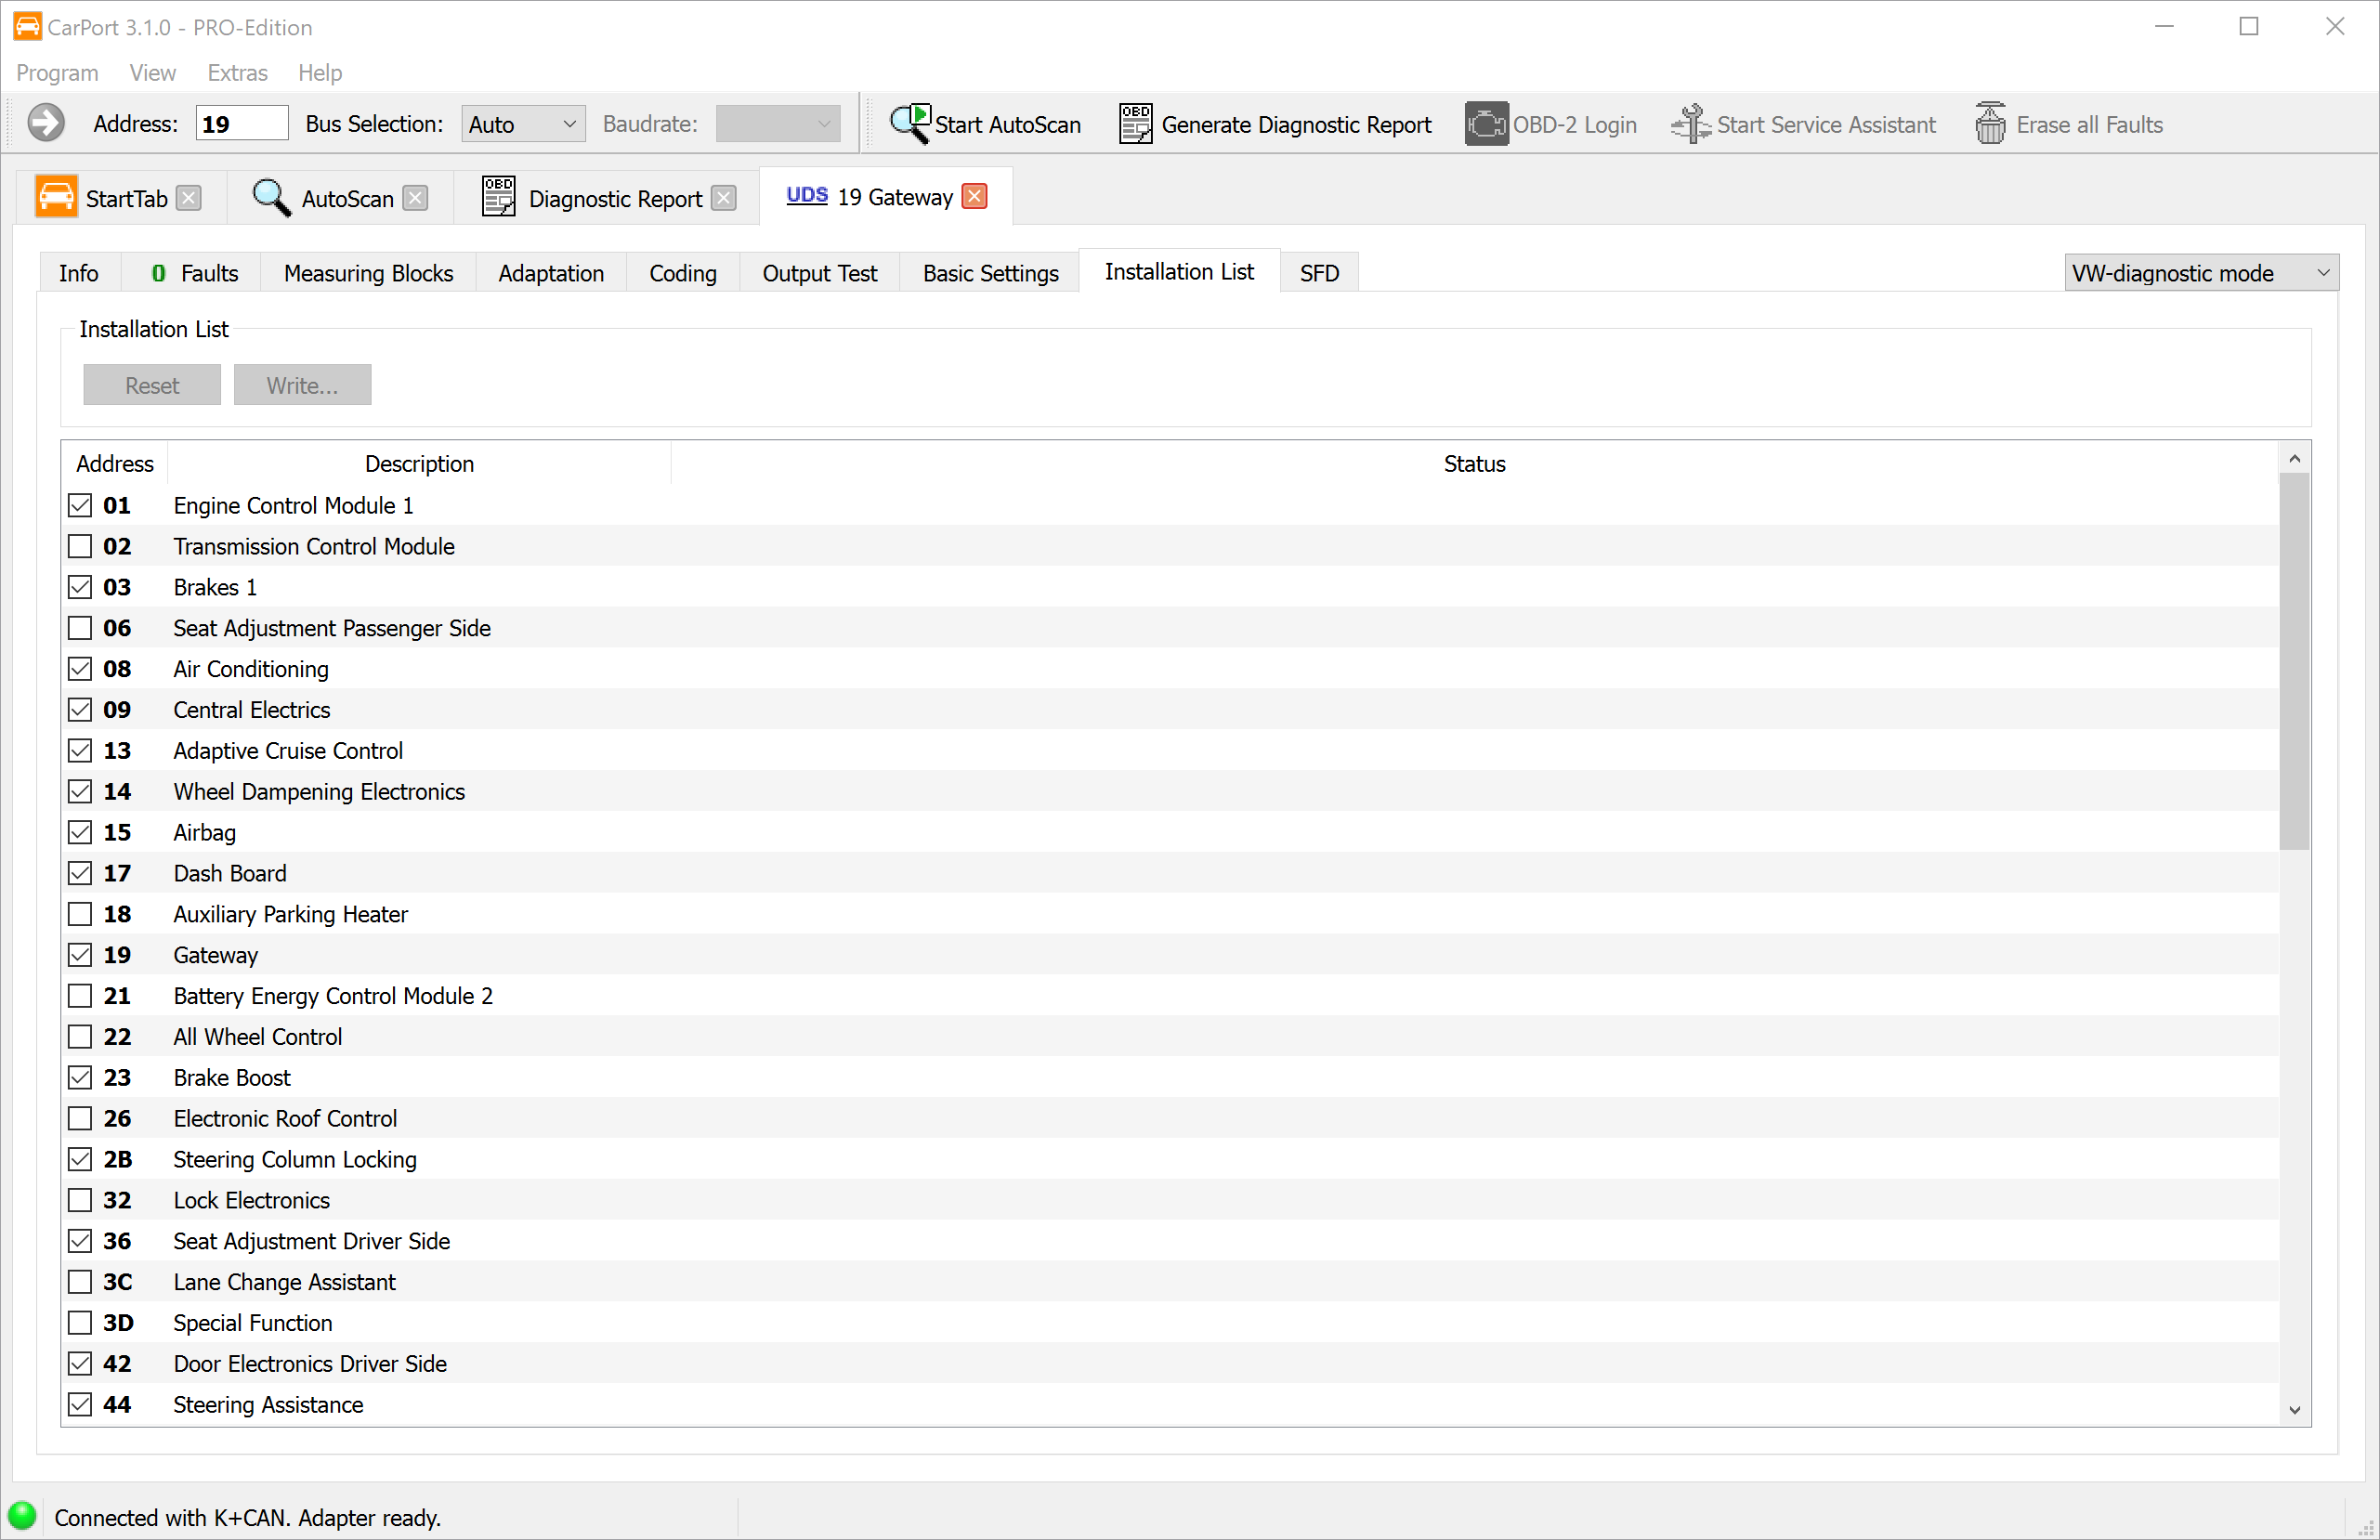
The installation list is a directory of all ECUs installed in the vehicle, stored in the diagnostic gateway (address 19). It serves as the central reference for which electronic systems are present in the vehicle.
ℹ️ Note: The installation list is only available on vehicles with a CAN bus diagnostic gateway. Older vehicles with K-Line-only diagnostics have no gateway and therefore no installation list.
What the installation list is used for:
CarPort uses the installation list in several places:
- ECU selection: In the
Installedtab, CarPort only shows the ECUs that are entered as installed in the installation list. - AutoScan: During the automatic fault scan, the ECUs listed in the installation list are queried specifically, which speeds up the scan considerably.
When does the installation list need to be adjusted?
Usually, the installation list matches the vehicle's actual equipment. However, there are situations in which you need to adjust it manually:
- Retrofitting components: e.g., a trailer hitch with its own ECU, retrofitting an auxiliary heater or a rearview camera.
- Removing ECUs: e.g., removing a system that's no longer needed.
- Missing or incorrect entries: In rare cases, the factory installation list may be incomplete or incorrect.
If an ECU is physically installed but not entered in the installation list, the AutoScan skips it and it doesn't appear in the ECU selection under Installed. Conversely, an entry for an ECU that isn't present leads to connection errors during the AutoScan.
ℹ️ Important: An installation list that doesn't match the actual equipment often leads to entries in the fault memory. If an ECU is entered in the list but isn't physically present (missing ECU), the gateway detects a communication error. Conversely, if an ECU is installed but not listed (additional ECU), dependent systems may generate error messages because expected data doesn't arrive. So always adjust the installation list whenever the vehicle's equipment changes.
Step-by-step instructions:
- Open the Installation List tab in the connected gateway ECU (address 19).
- CarPort shows the current list of all possible ECUs, with a check mark for each system entered as installed.
- Check the ECUs you want to add, or uncheck the ones that are no longer installed.
- Click
Write...to save the changes permanently in the gateway.
💡 Tip: If you want to discard your changes before saving, click Reset to return to the list as originally read. This is only possible as long as you haven't saved yet.
Diagnostic mode (UDS)
On ECUs with the UDS protocol, diagnostic communication takes place in different diagnostic sessions. Each session defines which commands the ECU accepts and which functions are enabled. CarPort automatically switches to the appropriate mode when establishing the connection—in certain situations, however, you may need to switch the mode manually.
Switching the diagnostic mode:
With a UDS connection open, you'll find a drop-down list for the diagnostic mode at the top right of the ECU window. The following modes are available:
| Mode | Description |
|---|---|
VW-diagnostic mode |
The default mode for VAG-specific diagnostics. CarPort sets it automatically every time a connection is established. All the usual diagnostic functions are available here (fault memory, measured values, coding, adaptation, basic settings, etc.). |
OBD-diagnostic mode |
Restricted diagnostic mode used both for generic OBD-2 diagnostics and for VAG-specific purposes. Read functions (fault memory, measured values, ECU info) are available, but write access (coding, adaptation, basic settings, output test) is not possible. |
Programming mode |
Programming mode for flashing ECU software. Required for firmware updates. |
End of line mode (EOL) |
Special mode for end-of-line tests at the end of the production line. Provides access to factory configuration functions. |
Development mode |
Development mode with extended diagnostic functions, normally only used in vehicle development. |
When do you need to switch the mode manually?
As a rule, you don't need to switch manually, because CarPort automatically sets the VW-diagnostic mode. However, certain special functions—especially individual coding options—require switching to the End of line mode (EOL) or the Development mode.
ℹ️ Note: On vehicles with a Secure Gateway (SFD/UNECE), only the OBD-diagnostic mode is available. The gateway blocks switching to other diagnostic sessions until gateway authentication has taken place.